Things I will need:
- latex gloves (7prs £1.50 Superdrug)
- glass bowl
- tinting brush
- paper towels
- bin
- mirror (or two)
- timer
- old t-shirt
- plastic caps
- old dark towel
Products:
- Lightener - Dark & Lovely 384
- developer 9 % 30 vol (If your hair is black/brown I don't recommend the developer that comes with the lightener it's not strong enough)
Potential colours (semi-permanent):
Ion Color Brilliance Brights - Red
Pravana - Red
AlfaParf Jeans Color - Chili Red
Fudge Paintbox - Red Corvette
Colorful Professional Protein Filler
Step by step process:
PRODUCTS CAN BURN, ALWAYS USE GLOVES AND AVOID CONTACT WITH SKIN.
- Make sure hair is clean (within 3 days) and that roots are loose and untwisted.
- Grease the hair line, ears, forehead and neck.
- Section hair into small groups.
- Put on gloves.
- Mix 1 part lightener and 2 parts developer til smooth and completely blended.
- Set timer for 50 minutes.
- Working quickly, start at the crown and work forward then back.
- Apply lightener 1 inch away from the root.
- Apply a shower cap and wait for 50 minutes (Checking EVERY 10 minutes).
- Remove shower cap and apply lightener 1/8 inch away from scalp.
- Reapply shower cap and wait for 20 minutes (Checking EVERY 5 minutes).
- Make sure all hair has turned evenly (use a blow dryer on low for 2 minutes if needed)
- Remove bands used for sectioning and wash hair in cool water squeezing through until all product is removed (minimum 10 minutes).
- Do a final rinse in warm water.
- Lightly squeeze hair in a towel until damp but not dripping.
- Place clean shower cap on and leave for 10 minutes using a blow dryer on low to create steam.
- Remove shower cap and begin applying temp hair dye.
- Saturate all of the locs to be coloured but avoid the scalp.
- Reapply one final coat of colour before placing hair into a shower cap.
- Wait 20 minutes following the instructions from your colouring product.
- Wash hair thoroughly in cool-cold water until water runs clear all over. Be sure to repeatedly squeeze water through each loc (root to tip) as well as to rinse behind ears.
- Saturate hair in warm water and apply coconut oil. Squeeze out excess water with your hands until they stop dripping and place a shower on for 20-40 minutes before finally rinsing in cool water. The same can be done with diluted conditioner if you prefer (only for mature locs).
- Pat dry and leave to air dry completely.
And that's pretty much how I did it. If you're going to try it yourself the process will vary depending on the results you want to achieve and what exact products you use but be confident in your own judgement and don't be afraid to ask for help. When mixing the developer try to add slightly more developer than required so that the mixture is a tad weaker, especially advisable if you only need a brown or golden colour rather than yellowy-blond. For individual locs or tips place each loc in foil instead of using a shower cap. For two tone colour always start with the darkest colour first.
In the end I used two boxes of lightener and around 200ml of developer to do my whole head though I only needed 125ml of colour. I highly recommend using semi-permanent colours as you'll not know the true result until it's on so better to have something that fades than something that's permanent.
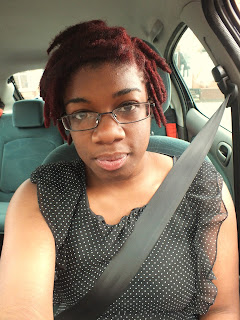
After my first attempt which appeared blotchy I then repeated the process which resulted in a red that was too bright and a touch too brassy/orange. I did a little research into how to tone down bright red hair and was surprised to find that many people have tried using brewed cold coffee. I didn't quite get around to trying it for myself but I did go out and get a reddish-brown colour (Adore 78 Rich Amber) and mixed it with the chili red I already had before applying it to my hair. It came out much richer and darker and really compliments my skin, eyes and glasses. It's funny because in all my research I never envisioned a brown/red combination but I'm in love with the results.
It was a lengthy process, far more complex than I could have foreseen. There were no guarantees and I had to be prepared for the worst, but all in all it worked out.
I'll update soon. Any questions, comments, please leave them below.
DREADLOCKS ARE...
**Photography ownership is held with the blog account holder. DO NOT use without permission. Slideshow created with Photosnack**


Your locs are really maturing and looking great. I didn't think I would like the colouring but I was wrong.
ReplyDeleteHey Jeff,
DeleteThanks a lot, I respect your honesty. I wasn't sure about the colour either but red is something I've wanted for years now.
Looking forward to some length by the end of the year. Let me know if and when you put up photos of your locs :)
I took some selfies of my hair yesterday. Not sure where I would upload them to but if you have an email I'll send them
ReplyDeleteOh ok thanks, it's naturalocs@hotmail.co.uk
ReplyDeleteAnother loc wearer created a fotki for her new journey http://public.fotki.com/EnviedBlue/thick-loc-journey/.
You can add pics as and when and create an album to look back on over the years :)
Looking good! I like this color on you! Very pretty!!!
ReplyDeleteThank yoooou :P
DeleteBeautiful Color & Love your Locs..
ReplyDeleteThank you very much. After months of admiring fierce locs like yours I'm glad to finally be a red head! :)
Delete